Category Archives: 1932 Flying Squirrel Racer

March update: Super Squirrel carburation

The way I’d finished 2014 was with a rough set up of twin carbs on methanol. I’d modified the needles and the jets, but it was all way too rich (post meeting dyno results here) and a rush job really. The truth is, sometimes you have to push through to get something done, knowing that it might need work later. I decided that I would move away from methanol anyway after that last meeting and so it was a case of starting again.

I measured the port sizes last year and the inlet on each cylinder of the Super Squirrel is about 10.25cm². It’s actually less than standard, as we block the rear most inlet apertures up to allow us to put windows in our pistons to aid transfer flow. A Scott standard inlet gallery (cast into the skirt of the barrel) has a lot of small bridged ports which work fine in a standard road machine. In a racing bike, they are not able to flow enough gas quickly enough once the work has been done to enlarge the inlet tract in the crankcase which feeds them. This inlet tract is very restrictive in size and any serious attempts at performance usually involve some substantial work to open this up. The ‘floor’ of the tract rises up as it follows the radius of the central flywheel which is housed immediately beneath it. What we used to do was to reduce the diameter of the flywheel and weld up the bottom of the tract to enable it to be opened out. Of course such a measure means complete re-qualification of the bearing cups and barrel locations as the whole lot will be pulled in to the middle. Not a job for the faint hearted! You can of course improve performance by working on the tract without doing the floor, but it just depends how much performance you want to extract. My crankcase is one of Rogers improved castings with a better floor profile, thicker sections and far better material.

So the inlet was around 10.25cm², but I was using a single overbored Amal type 89,

Ovally bored single carb used on the Super Squirrel since 1970.
which had been cobbled onto a Scott flange many years ago. It was about as big as you could get stuck behind the single downtube and was/is a really good carb, giving great pickup out of corners with no hesitancy, possibly down to the good gas speed due to its small size. However I think it’s undersized really as its aperture is only 8.04cm². That’s over 20% smaller than one of the cylinder aperture areas.
Since the Super Squirrel frame will not fit a larger single carb due to the frame tube being in the way, a split manifold seemed to be a good idea. Eddie Shermer made the one I have.
Twin carb manifold made by Eddie Shermer

I figured that I would try and get close to the inlet gallery area with the carbs, and so settled on the idea of 2 x 1″ Amal 276 (or 76) with remote float(s) as this pairing give an area of 10.13cm². Although I don’t know what the relative flow characteristics would be between one carb or two of half the area, I guess that the flow rate might be less with two due to a greater proportion of drag from the inside of the greater surface area of carb venturi wall. However, the atomisation could be better. We’ll see. I actually had a 7/8″ Amal 276 and and 1″ 76 and was toying with the idea of getting the 276 bored out. I decide instead to keep an eye on ebay to see if something came up and thanks to someone on the Scott Owners Club forum who spotted one, I bought a singularly unhygienic 1″ Type 76 a couple of weeks ago. It had exactly the same smell as I remembered when my dad’s shed was visited by rats many years ago. I remembered they were so big that the cats used to sleep on high surfaces to avoid having to meet them. It required a lot of scrubbing to get to a point where I could inspect it…

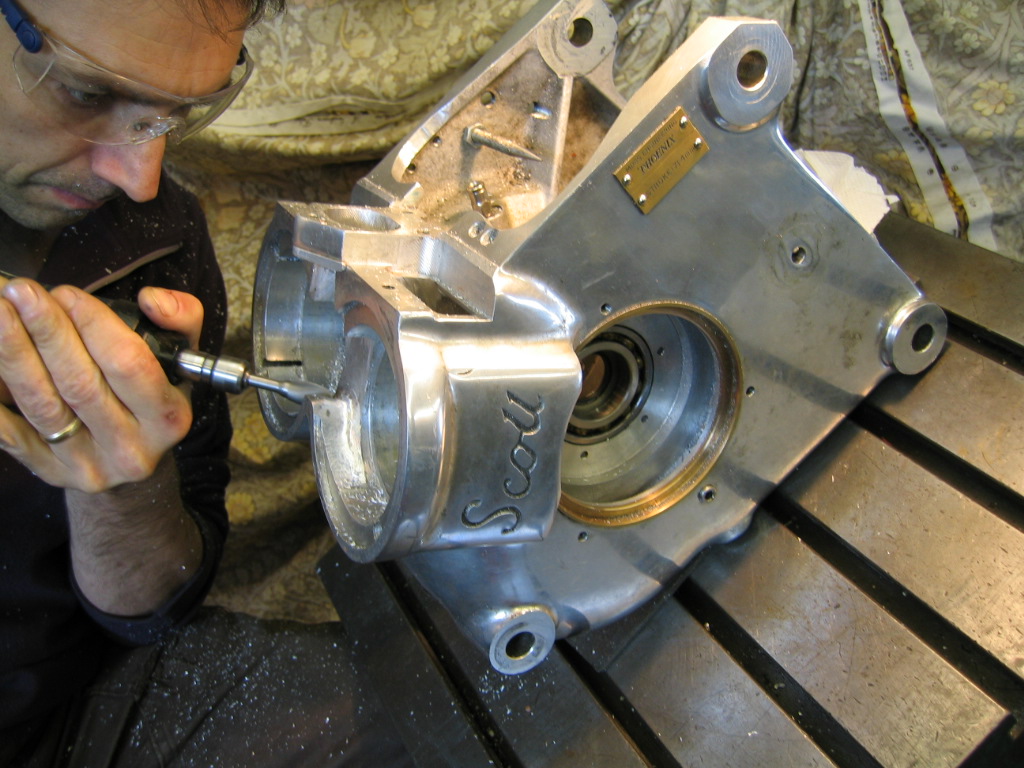
So just the body and the jet block, well corroded in. An evening of gentle heat, wd40 and physical persuasion wrought success and now I am on the way to getting the carb setup back together.

While I was doing this, I remembered that I’d been meaning to remove the head to see if I could detect any patterns which might give some information as to how the bike was running. Initially this came out of a conversation with Ignition and bantam tuning expert, Rex Caunt at Cadwell Park last year and even though I was changing fuels I thought I’d have a look.
I was very interesting…

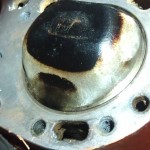
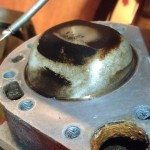
It could be that the clear sides of the crown indicate that I’ve achieved a functional ‘squish’ clearance preventing detonation (excellent article here). I’d really like to think that but I don’t (next day edit: I’m coming round, it might be a bit of this). It looks more like a tell tale that you wouldn’t normally see, but that my significantly over rich mixture is allowing me to see; the loss of unburnt mixture from the transfers straight owner the top corners of the piston into the exhaust. I might be wrong, but that’s my feeling.
It’s easy to see why it would happen, the transfer port is a bridged rectangular port which operates onto a deflector which is not rectangular, but is rounded at the top corners. The crankcase has stuffers cast in, which is a legacy really from the times where we weren’t running extractor exhausts. With stuffers and an extractor exhaust maybe it’s all a bit high speed into the cylinder and too much is being lost. Although I would expect to have some fresh gas returned to the cylinder prior to the closure of the exhaust port, this initial transfer gas would be short-cutting the scavenge cycle and so is not only unlikely to be returned but also not actually scavenging the cylinder of the remaining exhaust gases. What can I do if it is this? Well, Maybe some better shaping of the transfer bridge would reduce the tendency of the gas to bifurcate and disappear up and over the deflector. Maybe some mild shaping of the deflector could help. I had thought about removing the bridge but it does look like it’s too wide for the ring to cope.
I think it might be a case of planning a better cylinder and possibly looking at this for the Moss/Silk Scott racer too.

It’s all quite late now … I did spend about two hours scraping flat the exceedingly distorted flange on the new carb I bought but it’s still not done. Still, It’s all moving in the right direction.

Getting there...
Getting there…

January 2015 – Progress report

Well, we are moving in the right direction (I think) but I’ve a lot of ambitions this year so we’ll see how it works out…

Last weekend I decided to drive up to Leicestershire to see Roger and to help him improve security at his place, following the break in the previous weekend that resulted in the theft of a Yamaha RD 350 LC YPVS F2 (the one I had when I was 18 years old.. 25 years ago). He’d bought lights and I bought an alarm system and over the weekend we fitted it all and made the best of a bad lot.
I love being in the workshop and he’s still pushing forward with improvements to machinery and tooling, the latest being a DRO on the beautifully made Smart and Brown 1024 VSL lathe. You don’t need them, but they do make life easier and quicker.
It’s also good to be surrounded by his Scott engine work and I think we help motivate each other to do the best we can to make sure that our racing Scotts are in good competitive order for riding this year.
Sometime on Sunday morning we had a visit from Eddie Shermer, the editor of ‘Yowl’ (journal of the Scott Owners Club) and a skilled engineer in his own right. He and his wife also put great energy into organising the annual ‘gathering’ of the Scott Owners Club held at Abbotsholme School in Staffordshire.

Eddie Shermer, Roger and Thiel 158 universal jig mill. They were smiling until the photo!
Eddie does a lot of Scott transmission work but also takes on complete engine rebuilds too, and came to discuss possible solutions to a particular problem he’d encountered with a crankcase. It was good to see him and always interesting to discuss the engine issues.
In fact, I kept a Scott line going through the weekend because I’d arranged with Alan Noakes in Lincolnshire that I’d take the Silk Scott frame up to him so that he could make a start on the frame connectors. Lincolnshire is hardly on the way back to Devon, in fact around 2 1/2 hours in the opposite direction, but it meant that I could see Alan and chat through some of the details and also see some of the things that he is working on. He had some hardened and ground clutch hub centres as well as pressure plates that he’d made on the bench, and also a very compact roller starter that he’d even cast the rollers for. Very impressive.
Anyway, I couldn’t stay long as I had a 6 1/2 hour drive back home! Just back by midnight.

This last week, I’ve removed the carburettors from the Super Squirrel as I need to make some modifications for the return to petrol. I never had the twin carb set-up developed for methanol anyway (switching back to petrol this year) so it’s not something that I wouldn’t have to do anyway. The two carbs are Amal 276, but are of different bore sizes at the moment. I need to get them bored out to 1 1/16″ and also have some short inlet ‘trumpets’ made. They won’t be very trumpet like, but will just have a better radius for the air flow.
I’ve also got some ‘K-type’ thermocouples which I want to fit to the exhaust, fairly close to the exhaust manifold, to give extra information when I take it to so a dyno setup when the inital carburettor modifications have been done. Petrol will make everything run hotter, and I’ll need to be careful to try to make sure that I do what I can to make sure that I’m not overheating the piston. I may also fit a temperature sensor to a spark plug to read that, as well as coolant temperature to see whether the small radiator is able to shed heat. It’s possible that I could pressurise the radiator to help the situation, but it might not be necessary. I also have a slightly rough, larger radiator that I bought many years ago from the late John Hartshorne, a prominent Scott enthusiast who had some wonderful stories, not least from his work with Wilf Green in bringing East German MZ’s into the UK in the years before the ‘Iron curtain’ came down.
Also on the agenda is crank counter-balancing. A Scott engine, being a 180° twin has reasonable primary balance, and normally they are known as being fairly smooth engines. They have almost no actual balancing on each crank assembly however, as the cranks are too small. The engine relies mainly on the large central flywheel to help dampen out the residual vibrations, which it does reasonably well. Some people have drilled the side on the flywheel on opposite sides to try to counteract the implied rocking couple effect but roger has never been convinced of the efficacy of this process. His own idea was to view each crank assembly in isolation and to work to try to balance at least as much of the big end weight as possible. In his ‘four bearing cranks’ he has two crank ‘discs’ each side, rather than the usual one. His enables him, using tungsten heavy metal (and Titanium rods) to balance the big end if nothing else. Rogers engine is very smooth, much more so than my own, and seems to want to rev more easily. We have ‘slugged’ single sided ‘Moss’ cranks in the past for a couple of people, and one of them cannot praise its smoothness enough. My cranks are not weighted, but I have some heavy metal slugs and I want to fit them. Normally, the holes are put into the cranks prior to heat treatment, as the final specification of the material conforms to around 50 to 53 HRC which is pretty tough stuff to machine. I’ve been looking into using surface coated solid carbide cutters rated up to 60 HRC to machine out for the slugs. I’ll post further information on the calculated % balance. I think it should be interesting!

Anyway, enough for now. things are happening! Even the Triumph head is back although a little more work needed here too.
I’ll try to not leave it so long as we go through the winter.

October 2014: planning for the winter in the workshop.

So, the last British Historic Racing club meeting of 2014 at Cadwell Park has been and gone. In our calendar that is the sign that winter is on it’s way. What normally happens is that you think you’ve got plenty of time to get on with your bike project(s) but all of a sudden, it’s Christmas. Then, no sooner than you’ve sung ‘auld lang syne’, January disappears too. You are then halfway through March before you know it and suddenly you realise that the season starts in April and you’ve a week before the first practice day and you are no-where near ready.
Even though I know this, it will still happen…

I had thought that the Super Squirrel wasn’t quite working as well as it should after the frenetic ‘development’ work I did just before the meeting, but was very happy that it was working at all. It certainly went well enough to be competitive enough to have some fun but I know it could be a lot better and it was with that thought that I took it to the dyno at the beginning of October.

October dyno run

Torque

Super squirrel torque curve - October 2014
Super squirrel torque curve – October 2014

BHP

Super Squirrel BHP curve - October 2014
Super Squirrel BHP curve – October 2014

Steve, who runs the dyno said pretty much immediately that he could see it was massively rich… so much so that it’s just not able to run anything properly. He’s up for a longer set-up session, and with that in mind I am now trying to get everything together that I’ll need.

I’d talked to Rex Caunt at Cadwell Park. Rex is a friend of Roger’s and it was with his help that we fitted a PVL system to his Scott many years ago. He went on to fit a BTH magneto and I inherited the PVL system.
Rex is not just an expert on racing ignition systems, but he’s also very much involved with two stroke tuning and we had a long chat about my plans for development. He suggested analysing the exhaust gas temperature with some thermocouples to give me some idea of what was happening. Pressure waves behave differently in different gas densities, so temperature has an effect on the speed of the wave. I picked some up really cheaply on ebay.
I also bought some new needles and needle jets as the one I did are not suitable.

Once I’ve got everything ready, I’ll be booking a dyno slot.

Cadwell Park – September 2014 – part 1

I awoke at 7.30am. 3 1/2hours of actual sleep would indeed have been preferable to the energy drink induced, reclined wakefulness that I’d experienced. I was so tired when I woke up that I doubted I’d brought enough coffee to right the situation. Still, I was here, the bike was here.. all I had to do was to barely function and it would work out.

The identity of track days has changed a lot from what they once were. They used to be called practice days and were invariably for people who wanted to do some kind of set up work as part of their racing endeavours. When I started racing in 1988, I remember going to my first practice day at Cadwell and being blown away by RC30 Hondas. I was on the 1939 Tiger 100 for the first time, in fact it was the first time I’d ever ridden a bike with gears (excepting my 197cc Francis Barnett around the garden). I didn’t even know that you didn’t have to use the clutch every time you braked. I must have been all over the place. Makes me shudder a little to think of it. What these guys must have had to do in the middle of corners to avoid me…

This track day was specifically for classic bikes though and was, I believe, organised with the circuit by Tony Page who was involved in the Beezumph events for many years. Coming the day before the BHR meeting means that it’s well subscribed by competitors and spectators alike. People can make a really good weekend of it.

The format is pretty much the same for all trackdays. You have to sign on and sign a disclaimer. You then attend a riders briefing where they talk about how the day is run and safety on and off the circuit. They fit you with a wristband to say what group you are in; in this case the groups are self graded on your own assessed ability/ circuit knowledge / ego.
You get another wristband to say that you have actually attended the briefing and apart from getting your bike noise tested (105db max), that’s it.

The Scott doesn’t even have a rev counter.. they don’t really know what to do with it when you take it for noise testing. It’s quiet though, people always say with a little sadness that they can’t hear it when you are riding it. A Scott’s ‘yowling’ noise is unique to the marque and it’s a shame to stifle it with silencers. God knows what the yowl would sound like out the un-silenced end of a stinger though..

Then you have 15 or 20 minute sessions all day on a rotational basis. They just call out the colour of your wristband and you go down to the ‘assembly area’ and wait to be sent out.

Roger had bought the starting rollers and it was with significant crossing of fingers that I dropped the clutch that morning.
I needn’t have worried as after only a few seconds she spluttered into life and sounded pretty good. A moments contemplation of what we’d achieved passed over me before I realized that I’d yet to mix fuel and do some final wiring work. No rest indeed.

I think I’d definitely set the oiling a bit generously as the smoke screen was almost comical. It was as if the mist hadn’t risen that morning. I did wind it back later, but I thought I’d rather be safe than sorry initially.

On the track I arranged to circulate with Roger and then see what the relative performance was. At the Beezumph, the Super Squirrel had seemed to be faster than his on the straight and I was interested, having changed the head and the entire fuel system, in seeing what was going to happen now. Of course I had hopes of having to caress the throttle with the rear tyre spinning up as I backed into charlies, Moto GP style. It wasn’t quite like that. The first session, It seemed that my dad and I both circulated at low speed whilst waiting for the other one to catch up. There’s nothing like communication etc.

We actually managed it the next time, but instead of being able to pull away from him as before, I found him to be definitely stronger coming out of barn corner and I couldn’t catch him before we got into the top of Charlies, simply because I keep it on up the hill more than he does nowadays.

Not quite the overwhelming power increase I’d hoped for then, but still with so many un-tested changes it was working and working well.

Over the day I changed the timing a couple of degrees but did very little else apart from have fun. The front brake was starting to squeal a bit and felt like it was staying on a little after the lever had been released so after the last session I stripped and cleaned everything, copper-slipping the pivots, pivot bushes and cams and giving a bit more chamfer to the leading edge of the linings. They are still the old AM4 ‘Green’ linings on this brake, having been still available back in when i had them done over 10 years ago. They are great linings but they are so aggressive that they need a really good chamfer. The triumph has them also and five years ago when I was going into hall bends the front brake locked up solid… the chamfer on the leading edge wasn’t quite enough and it delaminated slightly shedding a sliver of lining which completely jammed the brake solid. Fortunately I wasn’t in the middle of Charlies but it wasn’t nice.

It was dark when I finished and just time to put everything away in readiness for the following day.

The push for the line – September 2014

As my second daughter was born on August 8th, a certain amount of sleep deprivation was bound to be involved in these final weeks prior to the September 28th/ 29th British Historic Racing Club’s meeting at Cadwell Park. Since my entire year’s work on the Scott Super Squirrel has really been focused on this meeting, I was determined that I was going to do everything in my power to get the bike as good as possible before I arrived, sleep or no sleep.
I had arranged with my dad, Roger, that we would attend the classic track day being laid on by the circuits organiser’s (MSV) on the Friday of that weekend and so it was with some relief that the bike was finished late on the Friday night before, almost a full week before I was due to be leaving for my Dad’s.

A sensible man would probably have looked at the improvements on the Dyno test results and decided to have left it at that for the year. I was not that man however, having tried and failed to have fitted the much anticipated twin carb conversion before the Beezumph in August, I was determined to have it ready for the last (and my only) BHR meeting of the year. The weeks of September had involved late nights flow testing the twin float chambers feeds to the carbs and setting the whole system up.

Twin carb set-up - september 2014
Twin carb set-up – september 2014

A fair amount of guesswork was involved in the choice (or manufacture) of main jets and I knew that the needles/ needle jets would be on the rich side, but I’d given it my best shot.
I had a moment though on that final Friday night when somewhere near 11 o’clock and undoubtedly tired, I dropped a washer whilst working to mount the inlet manifold. This was an awful thing to happen as the inlet was open at the time and I wasn’t sure where it had gone. I used a torch and a magnet to look into the inlet and couldn’t see anything. I then found a washer that met the description on the crankcase bottom deck.
I made a decision… this must be the washer.

Of course, it wasn’t.

The Scott fired up pretty easily (thank you easy start)in the yard of my friends farm, deep in Devon’s South Hams, the following morning. I had worried enough about the potential for ingested grit from his track to fit gauze filter bellmouths to the twin 276 carburettors and I was heartened by the seemingly strong pull of the motor as I headed up the track.
I don’t suppose I’ll ever forget the sound of the washer being bitten in two, twice.. not that I absolutely knew what it was at the time. It did stop the engine though.

As I put the bike back on the bench, I think I really knew somewhere as the first thing I did was to check the compressions on both sides.
Left, perfect .. no problem. Now right…wait.. I’m sure that should have been compression.

The transfer port cover was removed to reveal the kind of damage you would expect from a piston that had just sheared a 0.030″ washer in two using the top ring land and the edge of the port as cutting faces. The exhaust then told a similar story.

Damaged piston. September 2014

damaged piston exhaust - September 2014
damaged piston exhaust – September 2014

It was Saturday night. Five days before I was due to go up to Cadwell park via Roger’s.

Sunday morning my wife and I took my daughters swimming. It was peaceful, the calm before the storm I guess. I knew what I had to do in order to make this right and what kind of effort it was going to require and I also knew that I couldn’t do it in my workshop. I needed a little help from Roger.

So Sunday afternoon I call him. I tell him what’s happened and I know what his first reaction will be: ‘It can’t be done, have a ride on mine’.
It is the only sensible answer, after all I’ve got work and I look after the girls so my wife can work and that’s that… except that I still have the thing that fits so well with racing Scotts; The knowledge that if it is merely work and time standing between me and a functioning bike on the start line, then I can do it.
At 73, Roger’s initial enthusiasm for this kind of effort is less forthcoming but it doesn’t take long for him to come around. It is, after all, part of the game. It’s part of the deal of vintage racing, not to wreck engines, but immersion in this little drama requires an absolute agreement with oneself to work tirelessly to fix a problem when the odds are stacked against. Otherwise, there are always so many reasons to give up.

So, I gave him bore diameters so that he could grind oversize pistons ready for me and put everything in the van. I took an extra day off work and made the four hour trip on Tuesday night, arriving at midnight.

Wednesday 24th September.

Super Squirrel on stand at Roger's September 2014
Super Squirrel on stand at Roger’s September 2014

I put the bike on the ramp and gave Roger the cylinder block. The bores were pretty worn anyway and would definitely have appreciated a rebore, but not like this. There was fortunately no damage to the port edges so he started to set up on the big angle plate on his Thiel 162 horizontal jig mill.
He’d put the main ports in already before he’d ground the last of his old stock Silk pistons, 0.008″ undercut at the ring land and 0.004″ at the base of the skirt. I set them up to do the boost ports and cooling holes for the exhaust port bridge as well as the cutaways at the skirt for the extended inlet timing duration. This all sounds a lot quicker than it is.

After using an air grinder with a very small burr to oil groove the little end of the replacement right hand rod I handed it to Roger to hone to the pin size. All bores are done on fixtures to ensure accuracy as the alignments of the big and little ends on Scott rods are quite critical as as any out of squareness to the narrow big end tends to result in the 3/8″ rollers pitching themselves into the side of the rod with the tighter clearance and from then on (and with little chance for oil film) overheating themselves, the big end side plate, and the entire big end of the rod. Final assembly clearances are established with a hone.

After that, one side at a time, I used a tool Roger designed to establish the amount of back-facing required on the piston’s gudgeon pin bosses per side. Normally we aim to have a few thou clearance either side. The little end is therefore controlled but this controlled position is established using the free position of the big end assembly. It simply sits in the little end bush and, using a little knurled wheel, you wind out the centre which is on a fine thread until it touches the side of the bore. This gives a measurement from the side face of the little end bush to the bore face. Using a large set of vernier calipers you measure the gudgeon pin boss width and then you simply know that the difference is going to be about the right figure. Clever and relatively quick way to start the process.
Once you’ve got the figures you set the piston up on his vertical jig mill and very simply back face the bosses.

Backfacing gudgeon pin bosses
It’s a time consuming job to get it right as you need to do it several times and continue to measure the clearances but it is a great job when done.

With me working on the engine, Roger sets about one last modification for the day; the slugging of my bars to reduce the vibration I’d had at the Beezumph.
He turns down 6″ lengths of tungsten heavy metal and bangs them into the ends of the bars. Job done.

Turning down tungsten heavy metal for bar ends

Those are serious bar ends.

Thursday 25th September

The work to the pistons and clearances go on into the early afternoon, when Roger starts to gap the rings for the new block. Care has to be made to clear the existing ring stops and Roger wants to knock them in a little further. It’s something he’s done so many times…
Suddenly I realise that something has happened. I go over to see him and look down at the piston. The ring land is broken… a moments slip.
Bugger.
We’ve gone too far to quit though… it can still be done. The grinder is still set up. Coffee and then Roger sets to work on grinding a new piston.

It’s early afternoon on the Thursday. We were going to leave by 4 for the 2 hour journey North.

Of course at this point we can’t actually continue with the build together. Roger comes up with the freshly ground piston in quick time and I start the rest of the work.

Knowing that I have to also measure all the piston clearances to the head, I tell Roger to get up to Cadwell whilst he’s still got energy to do it. It’s about 7.00pm.

I knew that it was a bit ambitious to want to fit a new cylinder head but I also knew that I would have probably needed to have done some work to the piston crown or the combustion chamber on the existing head anyway. One of my ambitions for the year was to have fitted a high compression head that we’d over skimmed to allow a closer matching to the piston crown. There’s a reasonable amount of work though but this was the place to do it. High speed air grinders with big cutting tools make short work of aluminium and, using the extending rod that tells us the point that the piston is hitting the head, I started to match the two.

I had measured the original head volume at around 29cc, which I had thought to have potential to be reduced. I know Colin heath once ran a head with 19cc, and I once did one with pretty much the same, maybe a couple more. I knew that the expansion chamber was going to (hopefully!) also contribute to the amount of compression here but I thought a bit more squeeze would increase the speed of the combustion process and the efficiency of the engine. If you haven’t got an engine that can be made to usefully rev, then the alternative is to extract more power out of each and every one of the lower revs that you have. That’s what I’ve picked up anyway.

There’s a lot of ‘taking off the head and putting it back on’ involved but finally I got the clearance I needed and started the build. A shade under 25cc, roughly a 15% increase.

Around midnight things were going pretty slowly but were certainly getting there and by 1.30am I had the bike finished and on the van. It took me another slow moving half and hour to pack everything else up and I rolled out at 2am, drinking the fizzless remnants of an energy drink I’d had the night before on the long way up from Devon.

The roads are quiet early in the morning and the Lincoln bypass certainly helps. The long single carriageway section at the end of the A46 North was always a jam when we used to go up to Cadwell as kids. The old derelict (obviously haunted) mansion somewhere outside of Nottingham is now a health spar. So many points of reference have disappeared with the bypass, but it is quicker.

I got to Cadwell and crawled into the sofa bed in Roger’s van just after 4am.

Super Squirrel racer – dyno test results – August 2014

I really enjoy taking the bike to the dyno. It’s so useful to see the results of changes prior to driving 300 miles to a race circuit and it gives you a deadline to get things done by.
The rolling road dyno I use is at Alan Jeffry’s engine tuning workshop on the Valley road in Plymouth. Alan’s a really nice guy but the main part of his work is cars so the motorcycle dyno is run by GT motorcycles (01752 485000). A single run (at time of writing) costs under £40 including VAT and Steve, who operates it, is a two stroke fanatic and a very experienced re-builder and tuner. He had an NSR 500 (GP bike) complete with carbon chassis on his stand when I saw him on Thursday. People with NSR 500s aren’t going to let just anybody work on them.
It was all the more enjoyable since I was joined by Roger who, having made the journey down to Devon to meet his new grand-daughters the day before, was interested to see the improvements I had made.
I was there at 9.30am as planned, and then again at 9.45am… this time with fuel!
As I said in the Beezumph report post, it didn’t feel any quicker to me in the way it was delivering power, but I thought that it was pulling through a higher rev range. This wasn’t actually the case since it is producing more power, in fact it’s almost exactly doing what I intended to do when I started planning the modifications at the beginning of this year.

The plan was to try and get the engine to breathe better with some carefully executed gas flowing and port modifications, and also to extend the inlet timing a little to see whether I could take advantage of any negative pressure pulled by the exhaust before the transfer closed. By using Jennings’ port time/area calculations I was trying to move the peak torque up the revs a little from the previous 3500RPM (ish) to nearer 4000rpm. I didn’t want to lose the bottom end and I knew that was too easily done.

See the graph below. The blue line (as indicated) is last years test after returning from the final Cadwell park BHR meeting.

August 28th 2014 Torque Curve

How that translates into horsepower:

August 28th 2014 - hp graph
August 28th 2014 – hp graph

So, it shows that there’s a fair bit more power available and really well spread over the rev range. It may be that that’s why it didn’t actually feel more powerful, because it delivers it so smoothly over the range.
Whilst peak torque is up from 31.8 to 37.9 ft/lb (almost 20%), it’s interesting to see the change in revs that this occurs at. Previously it was around 3700 RPM and now it’s pretty much dead on 4000 RPM.
Also, driving out of corners should be much improved as low down torque is significantly better. I haven’t plotted the actual revs through the gears at corners for Cadwell, for example, but for slow corners like the Old Hairpin and the chicane after Mansfield this is where you really need that low down grunt, otherwise you get passed on the exit. At 3000 rpm, the torque is up from 23 to 31ft/lbs (35% increase). That’s pretty impressive to me.

So extrapolated from that, the peak power is up from 26 to 33hp, but still everything stops at 5000RPM. Steve said he could feel it wasn’t producing any more so he just shuts down. Whether it would actually rev any more anyway is another question. Unfortunately I have no idea what I am revving to because my Scitsu hasn’t worked since I converted to methanol. Apparently a common problem with inductive rev counters due to methanols highly conductive nature. Something I need to address sometime.
The main focus now is to fit the twin carbs to give me more intake mixture. The 30mm carb is definitely sized small and
I’ve got less than a month before the last Cadwell (27th and 28th September). It may well be that this will keep things going up toward the higher end of the rev range where the need for an easier ‘gulp’ comes into play. It may be that it loses some immediate pick up at low revs, but we will just have to see.
The other thing that I need to look at is the cylinder head. I’ve never worked on the head, it’s a standard ‘MOSS Engineering’ high compression head which is designed to raise the compression to a level acceptable on a fast road machine on petrol. Since I’m on methanol, I can deal with some extra squeeze and with a bit of time and effort I think I could get the compression a bit higher which would increase the burn speed. I’m then looking at 40 ft/lb as possible and maybe even a fraction more. I may even extend the rev range a little.
Ideally I need to get the work done in time to get to the dyno again before I go. Just over three weeks.. I’d better get a move on!

Babies and gearboxes

The fact I’ve managed to do anything on the bikes in the last few weeks is a minor miracle. My wife is expecting our second child and with D-day approaching fast, I’ve had to focus on preparatory DIY.

I have managed to move forward with my projects though, if not at startling speed.

The Super Squirrel racer is sitting patiently, waiting for a trip to be organised to Alan Jeffries dynamometer in Plymouth. After that I’ll be trying to get the new fuel system completed for the final Cadwell park race meeting for the BHRC (British Historic Racing Club) at the end of September.

The Moss/Silk Scott racer is just about to enter a new stage, as I’ve found someone locally who will soda blast the frame. It’s about double the cost of normal media blast cleaning, but I wont have to plug every aperture in the vain attempt to stop the abrasive media ingress. I also don’t really want it in my workshop if I don’t have to. It gets everywhere. In terms of my own time, I think it’s worth the extra. I’m intending to take it up there this week along with the oil and water tanks.
Roger (my dad) has also given me the engine (in bits) to make a start on and I need to do a dummy build to look at timings. A couple of months ago contacted a guy who lives fairly locally to me who has done some very impressive expansion chambers for more modern machines and told him about this project. He’s interested in looking at what would be necessary (or possible) in terms of pipes and he needs provisional timing information to run through his calculation programme. I’ll write more about it all in a separate post.

The main subject of my attention at the moment is the Norton Model 18 which we’ve had in the family for over thirty years now. The last time the Norton was used was I think 2001, when I actually used it for daily transport through the winter. I’d come back from five years of travelling and working abroad and simply didn’t have anything else. It jumped out of third gear a lot and pulling the chair only managed 47mph top speed but I really liked riding it, once I’d got used to riding an outfit.
I brought it down to Devon sometime last year with the plan of returning it to the road. Unfortunately as I wrote in one of my first posts on this site, their was a problem with the engine and I’ve temporarily replaced it with a later one. This requires a conversion to run using coil ignition and alternator.

Only last week I also removed the gearbox to have a look at the jumping third gear issue and unfortunately the news wasn’t great.

Damage to dogs on Norton four speed gearbox
Five gears had reasonable damage to the dogs and I’ve ordered some (also secondhand) replacements from the Norton Owners club. Also the gearbox casting is cracked at the lower gearbox mounting pivot on the drive side. Apparently this is a common problem and I will have to get it welded. It’s a design weakness here I think so I’ll have a look at some possible improvements to the arrangement. I need to order a bunch of other things for it, but it’s a really nice bike and is too good to sit around for another 10 years. My grand plan is to get it recommissioned and use it my everyday road bike. It’s much more of a sensible option than in many other counties too. The route between here and work is about 50% tiny lanes where you often can’t do much more than 25mph anyway. The roads through Dartmoor are more open than the ‘lanes’ in the South Hams but the presence of sheep, cattle and ponies create an element of surprise. The undulating nature of the land favours a engine rich in low down torque and flexibility. This terrain is the ideal stamping ground for a big single more than anywhere else I know!

Beezumph 2014 report

Well, I tried to get the twin carb manifold completed before Beezumph 23, on the 12th July but it was not to be and I was glad that I’d made the decision to leave intact the entire single carb assembly, fuel lines and all, just in case I needed to put it back. It was a close run thing and I actually still hadn’t finished the bike when it went in the back of the van but in fact retaining the single carburettor gave me the opportunity to assess the changes I’d made on the engine with more certainty as to what had affected what.

Just to re-cap, the Beezumph is not a race meeting but a track day organised by the vibrant Trident and Rocket 3 Owners club, many of whose members bring their machines out for this spirited social occasion. I first went in 2001, I think, and Roger a couple of years before that. I think it was his first return with the Scott to the track after some years of working hard to build his workshop and business. I believe that first time he attended he was awarded the ‘man of the meeting’ award by Doug Hele after having caused great amusement having repeatedly passed very much more modern bikes invariably by diving up the inside of them into corners.

I got up early as I still needed to finish a few details. Rear chain tension and corresponding alignment of the rear wheel needed to done, followed by the wiring of the rear brake torque arms and wheel nuts. A good check over and then put the kettle on for the morning coffee.

The fog that had descended on Cadwell park the previous evening lingered for a while in the morning lending it a brigadoon-esque feeling of a world apart which I’ve always felt Cadwell somehow symbolised anyway. You can be a hero just for one day at a race meeting, away from normal sensible life, normally in battling to fix things in adverse conditions. Two years running I worked ’til two in the morning at the last vintage Cadwell meeting, stripping and rebuilding a jammed Scott clutch (having three gears is hard on a clutch). I’ve ridden hundreds of miles to fetch a replacement component to fit overnight. We fixed a hole punched through Rogers crankcase by a fallen transfer cover bolt with epoxy and underpants so that Paul Dobbs could continue to race the same day. It’s still the same today.
So the fog delayed a little the start of proceedings but when it did finally lift, it revealed a beautiful day which was at times almost too hot in racing leathers.
In short it was perfect.

Beezumph has become a family favourite, and until very recently (Babies have arrived) there were regularly several of us making an event of it. As it was, three Scotts and their owners turned up to support us and it made a very fine line up in the paddock. Richard Rawson and his fine Silk Scott and friend on his very nice Birmingham Scott, and then Alan Noakes on his beautifully detailed, girder forked, Flying Squirrel.

2014-07-12 12.54.06
2014-07-12 12.57.17
2014-07-12 12.55.03
2014-07-12 12.55.58

I hadn’t mixed my fuel and so set to work with the ingredients. The engine had not appeared to have enjoyed a surplus of oil in the bores from my inspections after the previous season and so I’d decided to reduce the acetone percentage in the mix in case this was simply stripping the lubrication out. Acetone is one of the things that came up in my research when I was looking at running on methanol and my understanding is that it’s used to help combat pre-ignition in leaner fuel mixtures and possibly aid starting. I had decided on a 5% Castrol M, 10% acetone and 85% Methanol mix previously but this weekend I reduced that to 5% Acetone to see whether that made a difference.

Not having even run the engine since I started working on it at the end of last year, I was glad to have an offer to use someones starting rollers.

With the drippers set high feeding Castrol R through the non return valves direct to the main bearings she turned over for a few seconds before gradually starting to fire. A tell tale hanging of mist in front of the carb opening showed the effect of the extra inlet duration I had applied. I expected that that would only be present at lower revs, but we would see. When cold she always carburates poorly and there’s a significant lag on the throttle as if the cable has a length of elastic in it. After the engine warms up, she’s immediately responsive. Methanol simply runs so cold that when the engine is also cold the atomisation seems to be quite poor. That’s what I imagine anyway.

So up and down the pit road a couple of times and then out in our session.

The beezumph has different categories and they range from beginner (marshall led laps) follwed by classic, fast classic, open (any age of bike) and then expert classic. We go in expert or equivalent normally simply because you can get problems with people being unused to being passed around a corner in other classes. Last year in fact, Roger decided to go in the fast classic group thinking that class more appropriate. He was 72 and on a 1934 bike and so thought he’d give it a try. He found, as is often the case, that he was being passed down the straight by more modern, faster bikes which then proceeded to brake very early where a corner was approached. Thinking that they may be stopping to attend to natures call or maybe a sandwich, he would pass them. Some take seeing a pensioner riding a vintage girder forked bike up the inside of you at a ridiculous angle of lean with great humour and enthusiasm, but not all. Roger would invariably pass, undoubtedly at a significantly higher (if not warp) speed, until their desire to storm by on the straight was diminished by a growing sense of futility in the action. There-after some are merely crest fallen, whilst for the special few indignance steps in to protect a fragile self esteem..
One rider was so affected by this (whether through genuine fear or critically injured vanity it’s not known) that he complained and Roger was informed that if he wasn’t able to pass on the straights then he should not pass.
This year he returned to the self appointed experts class, where passing on corners is in fact expected.

The first session out, I was obviously quite sensitive to the engine’s character as much work had been done since last season. It seemed to me to have less torque low down and be therefore slightly less drivable out of the corners. However, the engine seemed to be be pulling longer through the revs and although the majority of bikes (750 Tridents and Rocket 3’s) were easily faster down the straight, it wasn’t the difference I would have thought. I thought I felt the engine tighten a couple of times (though I might have been over sensitive) so I took it relatively steady.

I raised the needle before going out the second time and was not to feel any hesitation again. I kept behind Roger for a couple of laps to get a comparison between his and mine and he thinks that I have about 2 or 3 mph on him on the straight. maybe 5. It’s doesn’t feel quicker than last year in the way it delivers power, but I think that actually I’ve made it breathe so much better that it’s simply getting more in at higher revs and therefore revving longer. Extra vibration has come with this, but we’re going to slug the bars with tungsten heavy metal to help here. Although my dyno tests last year are compromised by the fact that I’d blown a head gasket, I think the torque curve will be broadly representative and a comparison will show me what has actually happened. I look forward to getting it on there and will not change to the twin carbs before I’ve tested with the single. I’ll then swap the carbs before going back for another test. It’s going to be interesting.

So in the end, the bike was flying and little was able to get past and stay past. True, it’s a track day and not everyone is wanting to ‘ride it like they stole it’ though some are. It’s easy to walk away from a track day thinking that the bike is a rocket and that you are riding at the edge of human ability then go to a vintage racing meeting and get lost in the wake of serious riders on seriously developed machines. Saying that, mine is a seriously developed machine. By the time I get to the last vintage Cadwell it will have been my only race meeting this year. Family and work commitments coupled with a realistic budget have prevented me from attending more, but not in idle have we stayed away and I am hoping that when we do turn up to the last Cadwell at the end of September that we are able to move further toward the front of the field than we have before.

I’ve never won at Cadwell, and whilst I do all this for so many reasons beyond achieving a position in a race; this is what drives my desire to develop of course. To win, one day on my Scott Super Squirrel against good men on good bikes at full circuit Cadwell park. Of course it’s a folly, but what a grand folly!

June 2014 – a review

The rebuild of the Super squirrel racer is in its final phases.. and so it has to be as it’s entered for the Beezumph at Cadwell park on the 11th /12th July. I need to do a piece on the final assembly and some of the things I’ve experimented with.
I’ll default to the single carburettor that I know works if time really dissapears but I’d really like to try and get the twin carb set up finished and ready as it really might fly with a bit of extra gas coming in.

Ovally bored single carb used on the Super Squirrel since 1970.
One of the main reasons that Roger evolved from this single down-tube frame to the duplex frame on his bike is the ability to fit a bigger carb. He obviously felt it was holding the engine back. I thought I’d have a look at this further.

I’ve had a twin carb manifold for a few years which was made by Eddie Shermer. It splits either side of the single tube and gives you the advantage of standard two stud carb mounting rather than the unique Scott three bolt pattern. I have been intending to use the two Amal 289 carbs that I have previously used, albeit briefly, with this set-up. Although it seemed to go well at the time there was insufficient opportunity to really test its performance. That was with petrol, not methanol so a direct comparison is not possible. I have had a feeling that the 289’s will be too big though.

Twin carb manifold in position

A couple of years ago, when I first set the bike up on methanol I approached various people for advice. Roger Cramp of Velocette racing fame had built and developed two strokes to run on methanol and he kindly gave me the benefit of his experience about carburation. One of the things he said was that with methanol he’d found it very important to make sure that you had sufficient gas-speed over the emulsion tube to ensure that you had adequate atomisation, and he found that he’d reduced carb throat size to achieve better results. I imagine this principle applies to any fuel, but methanol is more reluctant than petrol to diffuse it seems. My single carburettor that sits behind the downtube is quite small and it works perfectly with good clean pick up throughout the range and it’s difficult to imagine that the pick up could be better. I don’t want to lose tractability so I thought I’d look at the relative areas.
Twin carb manifold made by Eddie Shermer

The inlet port on a single cylinder measures about 61mm x 16.8mm which gives around 10.5cm². I make no apology for change in units as I use what helps me visualise better! I’ve ignored the single bridge in this port, but reason that it will effectively make the port a little smaller.

The single carb I use at the moment is an Amal 289 bored out to about 32mm. This area is 8.04cm²
The 289’s I have are about 28mm bore and this is about 6.15cm². Two of these is 12.3cm²
A 1″ 276 is about 5.06cm². Two of these is 10.12cm². This would seem to be a better match.

It seems to me that I should try to at least have the carburettor inlet area quite closely matched to the actual inlet port area and that all my work on getting more gas in is a little pointless if I don’t increase the carburettor size. I think it will be very interesting to see what two of the 276’s will be like though although it’s going to be a push to get them and do the calculations for needle and jetting modifications before the Beezumph.

The engine is now together and primary chain and ‘magneto’ belt fitted and tensioned.
Securing the engine is a procedure on my Scott as it is fitted with ‘tie-bars’ which replace the lower frame rails. We tension these before the engine bolts are finally done up to pull everything together.
Also requiring a procedure is fitting the primary chain.

The Scott uses an ‘outrigger’ final drive sprocket which is secured through slots in it’s casting to the undertray. The undertray is an aluminum casting which bolts into a Scott frame and carries the gearbox and final drive as an assembly. The gearbox itself is secured using two long studs projecting from the bottom of the gearbox and passing through slots in the undertray to allow adjustment of the primary chain. Under acceleration the outrigger tends to get dragged rearwards along it’s slots, thus wearing the ‘high gear bush) in the gearbox putting bending moments on the output shaft and also encouraging the entire gearbox rearwards also. When this happens the primary chain tightens which puts pressure on the main bearings as well as buggering the chain, wearing the drive sprocket and wasting power.
One of the ways to avoid this is to cut out a little piece of metal to very closely sit in the slot of the outrigger to prevent it being dragged rearwards. Roger did this for years. Now we have snail cams fitted to the rear undertray mounting on the drive side to wedge against the back of the outrigger.
The other part of the gearbox bolting procedure is to make sure that after everything is locked in position, we make sure that the backlash in the adjuster for the gearbox position is taken out so that it also is playing a part in making sure that the gearbox is not pulled backwards. I then wire lock this adjuster nut in position. If this is not done, the gearbox will be pulled. The Scott 3 speed gearbox is a rugged device, but simply ‘doing the bolts up’ is not enough. These two procedures make sure that the gearbox stays where it should.

This weekends engine rebuild

After what must have been the longest Devon to Leicestershire trip I can remember doing, I arrived on Friday night with a view to getting the bottom end of the Scott Super Squirrel racer rebuilt by Sunday afternoon.

I knew that I was going to change the main bearings, as the ones I had were a bit notchy in the case. I also wanted to do some more gas flowing on the crankcase to allow me to use another inlet port that was blanked off by part of the crankcase as my calculations had shown that I was deficient in the inlet gas flow. I also wanted to check the static flywheel balance and the crank assembly end float and alignment.

The first thing I did was my porting as I knew I’d have to clean up the cases before replacing the main bearings.

Opening up the last inlet port.
It’s all so much easier with proper air tools! I’ve been spending hours with a riffler file to do stuff I could do with an air tool in less than half the time. Files are safer though! Easy to make a mistake with an air grinder.

Apart from a little de-burring here it is finished:

Just finished grinding the final inlet port access.
Scott cases ready and waiting for attention at Mossengineering
Roger working on a customers engine.

One of the first things we noticed when we looked carefully at the crankshaft assembly was there looked like there had been some movement on a crank taper. Wanting to err on the side of caution we set up a lap on his Thiel 158 jig borer to just make sure that the tapers were good and clean in the flywheel. A bit of gentle lapping and all was fine.

Lap for cleaning up minor surface damage in tapers.

Next, we checked the static flywheel balance before ‘knocking up’ the crankshaft/flywheel assembly for checking the distance between inner control faces on cranks. This, we compare to the bearing face to bearing face measurement of the crankcase to determine the end float as you cannot feel and measure it by simply moving the crank side to side when installed as I used ball races and not rollers as standard.

Static flywheel balance
Drilling flywheel for balancing

See here Roger’s magnificent Thiel 162 horizontal jig mill. We dug out the floor with a mini digger and filled it with at least 1 meter deep of concrete to create a sturdy foundation for this. Table rotates 360° and flips up to 90°, whilst the whole machining column can move in and out. The spindle then can be moved forward/back and up/down.

Thiel 162 Jig mill
Thiel 162 Jig mill

Tooling
Tooling

The Smart and Brown 1024 VSL lathe is a good place to put up the crank and flywheel assembly between centres (he sells these if anyone’s interested) IMG_4182We measure skip and run-out just to make sure there are no problems.
Checking the crank assembly for run-out

I made a new key, using slip gauges to determine the width. You have to be careful to check the height of the key as well as the length in case these prevent the flywheel tapers from safely locating in the flywheel.

Flywheel/ crank timing key. This is to time only and is not for driving purposes.

After all this, and before the assembly, the old bearing were removed and the cases heated to accept the new ones. The 22 tooth drive sprocket was deemed to be too worn and a replacement was bored out to suit the spigot and fitted.

measuring for the new drive sprocket

After that the new oil seals were fitted to the housing behind the main bearings and then the cranks finally installed and ‘knocked up’. The key doesn’t transmit load, it absolutely is not meant to… the taper has to do that. The crank tapers are driven in by tightening the centre bolt and then (with adequate provision to provide a dead stop on the other side) the centre of each crank is struck using an aluminium mallet, or large diameter drift alternately whilst continuing to tighten the centre bolt. There will come a point where the bolt cannot any longer be easily tightened and this is then considered done.

All in a very successful couple of days and a bottom end that should hopefully last for a while!